

This guide offers the quickest way to install and begin using the eXist XML Database system. Although this guide assumes users have a basic knowledge of XQuery and XML, eXist can be used as a tool for learning these technologies. However, it is recommended that users consult other reference and tutorial resources. Some useful resources are suggested at the end of this document.
To begin, download the latest standard distribution of eXist. This package is recommended for new eXist users and includes a graphical installer that guides you through the installation process. This standard distribution comes as an executable .jar (Java Archive) file, which automatically determines the correct system settings (i.e. paths and environment variables) for eXist. On Windows and Linux Operating Systems, the installer can also create desktop shortcuts.
Once the download has completed, start the eXist installation by doing ONE of the following:
For Windows and Mac users, double-click on the installer file: eXist-[version]-build-XXXX.jar
OR enter the following Java command in a Unix shell or Windows command prompt using the -jar option:
This will launch the installer. Simply follow the steps to complete the installation process.
To run the eXist installer package, ensure that JDK (Java Platform) 1.4.2 or later is installed on your operating system.
The eXist installer requires a graphical desktop in order to launch. However, If you wish to install eXist on a headless system, use the -p parameter when following Option Two above. This will automatically start the installation. Option -p expects a single parameter: the path to the directory where you would like to install eXist. For example:
After the installation has completed, you should now be ready to launch eXist. If the installer has created shortcuts, simply double-click on the eXist Database Startup icon or select this item from the start menu located on the desktop.
To start eXist manually, do the following:
Open a Unix shell or DOS command prompt
Change to the directory where you installed eXist
If you are a Unix user, enter the following:
If you are a Windows user, enter the following:
If these scripts do not launch eXist, you can load it directly with the bootstrap loader by entering the following into the console:
If you have problems understanding or running the shell/batch scripts, read Running Executable Files below.
While eXist starts up, log output might appear in the console. If eXist was launched properly, you should see the following:
In the default setup, eXist is running inside a web application served by a pre-configured Jetty webserver. All interfaces are provided as servlets. To test that the server is running, enter the following URL in a web browser:
http://localhost:8080/exist/index.xml
You should now see the following web page:
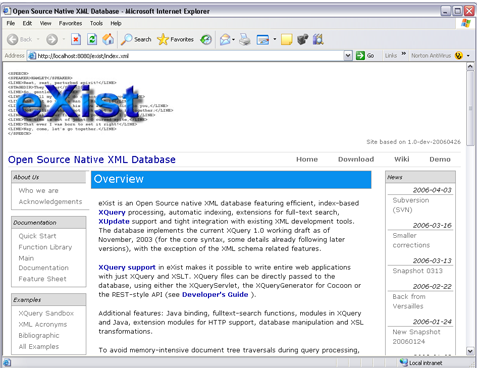
Note that this is not the eXist site homepage, but a local copy of the website included with the eXist installation. These local files include eXist documentation, function libraries, resources, and XQuery examples.
If the above start-up fails, ensure the EXIST_HOME and JAVA_HOME environment variables - the eXist and Java JDK root directory paths - point to the correct locations. Both variables are set in the startup.bat and startup.sh scripts.
EXIST_HOME should point to the directory of the configuration file conf.xml, so that the server uses the path EXIST_HOME/conf.xml. For example, if the EXIST_HOME path is C:\Program Files\eXist, the server will look for C:\Program Files\eXist\conf.xml
JAVA_HOME should point to the directory where the Java JDK is installed. A common problem is that the path added by the installer points to the JRE, not the JDK.
Also ensure that you have "write" permissions set for the data directory located in webapp/WEB-INF/.
To begin using the database system, you must first create document collections and import files to eXist. To help you in learning these and other basic database operations, a number of simple XQuery web applications have been included with the eXist distribution. These applications are designed to allow users to experiment and query the eXist database using sample XML documents.
|
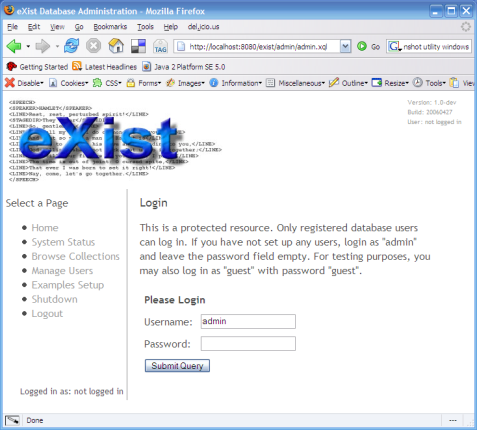
To start using these example applications, you must log in to the eXist database administration page. To log in, go to the link (http://localhost:8080/exist/admin/admin.xql) located on the sidebar menu on the local eXist homepage (http://localhost:8080/exist/) You should now see the login screen as shown on the right. Enter the username "admin" and leave the password field empty. |
 |
|
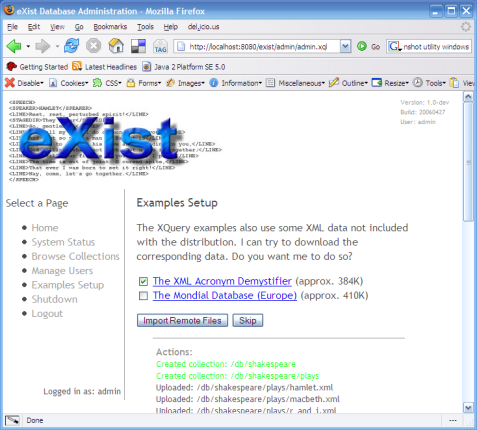
Once you have logged in, select from the menu on the left. Click on the "Import Example Data" button to start the setup and begin downloading example data from the Internet. This will produce a screen asking if you would also like to download additional data from the web. Since these files are not required for this test, we can select the "Skip" button. Once you are more familiar with eXist, you may want to go back and add the "The XML Acronym Demystifier" and "Mondial Database" data to try other database queries. |
 |
|
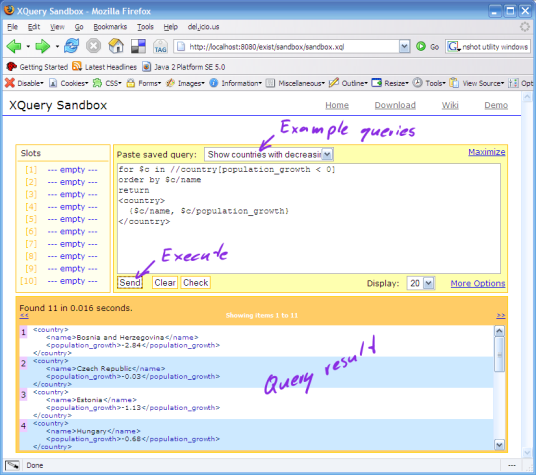
After the example data has been uploaded, you will be able to query the sample collections on the "Examples Page." Here you will find a number of small web applications that employ eXist and XQuery. The simplest of these applications is the "XQuery Sandbox" shown on the right (http://localhost:8080/exist/sandbox/) which allows users to submit example queries to the database. This program provides the easiest way for users to start experimenting with eXist and XQuery. |
 |
In addition to the web-based eXist interface, eXist provides a Java-based admin client. This application enables users to perform more complex administrative tasks, such as user management, security settings and backup/restore.
This GUI client can be used either as a graphical interface, or through a DOS or Unix command-line - which uses parameter options for specific tasks. If no action is specified on the command-line, the client will enter "interactive mode" and display a graphical login interface. Additional information on using the admin client from the command line, is available in the client documentation.
You can launch the client by doing ONE of the following:
For Windows and Mac users, double-click on the desktop shortcut icon (if created) or by selecting the shortcut icon from the start menu
OR launch using Java WebStart:

You can also find the Java WebStart launch icon in the menu in the left sidebar of all documentation pages. NOTE: Java WebStart needs to be found by the web browser and the eXist jars need to be signed (if you compiled them yourself)!
OR enter the following in a Unix shell or DOS/Windows command prompt:
OR if both of the above approaches fail to launch the client, you can enter the following on the command-line:
|
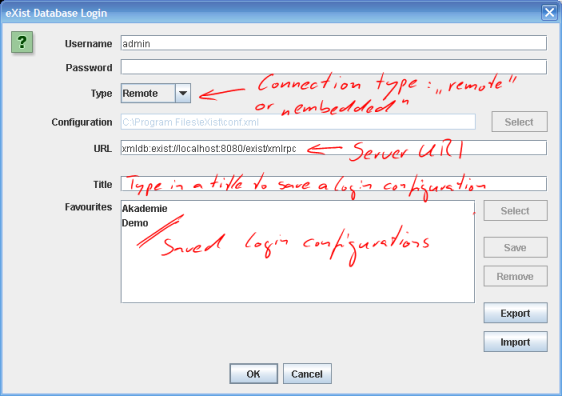
A screenshot of the client login interface is shown on the right. At the login window, you can provide your username and password, and select a server. The client can either connect to a Remote server, or launch an Embedded database (i.e. embedded in an application), which runs in the same process as the client. This option is useful for backup/restore or mass-uploads of data (writing to an embedded instance avoids the network overhead). If you connect to a remote database, the URL field specifies the location of the db server. The URI scheme used here is standardized, and for standard database setups, use the displayed default URI (xmldb:exist://localhost:8080/exist/xmlrpc). More in-depth information on server URIs and their function can be found in the deployment guide. To log in to eXist's default administrator account, use the "admin" username. if you have not yet changed the admin password (e.g. your first log in), leave the password field empty. After clicking "OK", the main client window will open (see the next screenshot). |
 |
|
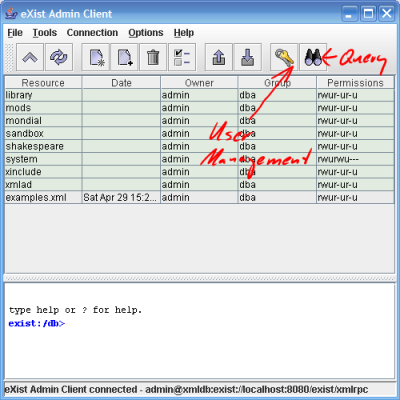
Once you have logged in, a client window will open. This window is split into two panels, as well as a top menu and toolbar. The top panel lists the database collections; the bottom panel is the "shell" and has a command prompt. This "shell" allows you to manually enter database commands. Most commands, however, can be entered using the menu. All of the menu and toolbar items have mouseover annotations that explain their functions. |
 |
|
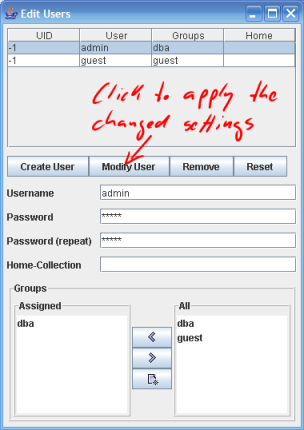
eXist can be used for applications intended for online web publications, or as an embedded library. If you plan to use eXist for an online application, you expose it to potential exploitation, and so it is strongly advised that you first change the admin password. To do this, follow these steps:
|
 |
It is recommended you properly shut down the database before killing the server process. By not doing this, data files may become corrupted. There are several ways to trigger a shutdown:
Admin Client: select from the menu.
Web Admin Interface: select the link (http://localhost:8080/admin.xql)
Run the bin/shutdown.sh (Unix) or shutdown.bat (DOS/Windows) scripts.
Manually enter on the command-line:
To specify the username and password, pass the -u and -p parameters on the command-line. By default, the command attempts to shut down the database running at the default URI: xmldb:exist://localhost:8080/exist/xmlrpc/db. To shutdown a different database, use the corresponding URI and the -l parameter. For example:
If eXist has been deployed as a web application in a web server other than the supplied Jetty server, calling shutdown will close the database instance, but not the server process of the web server. Since eXist does not know in which environment it is running, it can only close itself. Regardless, closing the database explicitly is always a good idea.
Instead of manually running the eXist server in a shell window, you may prefer to run it as a background service which is automatically launched during system startup. eXist comes with pre-configured scripts that use Tanuki Software's Java Service Wrapper to handle the setup procedure. The required scripts are contained in the directory tools/wrapper. On Windows, you can simply choose the option to Install eXist as Service from the eXist menu created in the start menu. You can also call tools/wrapper/bin/install.bat instead. This will install eXist and Jetty as a Windows service.
After executing the install.bat script, you should find eXist listed in the list of services currently registered with Windows:
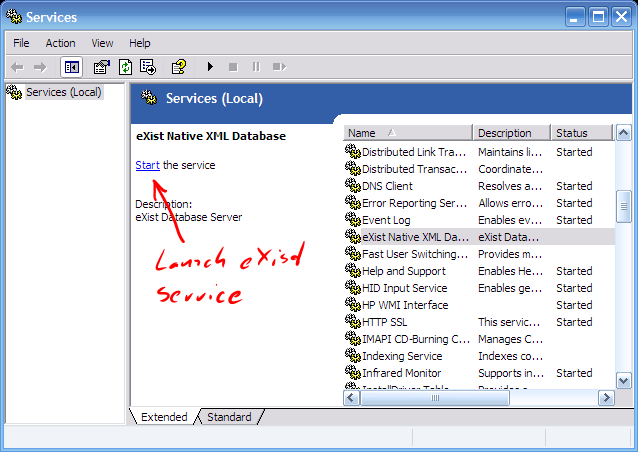
Once the service is registered, you can launch it via the service manager as shown in the screenshot or from the command line:
For Linux, all of the start/shutdown scripts can be found in tools/wrapper/bin/exist.sh. You can create a link to this file from the init.d directory of your distribution (where all of the start/shutdown scripts reside). Normally, the directory will be /etc/init.d. For example:
You can then add the service to the correct system runlevel. Check with your Linux distribution for instructions.
If you experience any problems while installing eXist, your first step should be to check the log files to get additional information about the source of the problem. eXist uses the log4j-package to write output logs to files. By default, this output is written to the directory webapp/WEB-INF/logs. Or, if you are running eXist as a Windows or Unix service, check the directory tools/wrapper/logs. The main log files for eXist itself are exist.log and xmldb.log. The other log files show output from Cocoon.
If you encounter a problem you are unable to fix, check the mailing list archives for postings on similar errors. If you cannot find a posting, or you are still unsure about the problem, you might consider posting your problem on the list for feedback. If you do decide to post a message, please include any exception message you find - both in the logs and the console, and ensure you post the server-side, and not the client-side messages (client-side messages such as browser errors are not useful for troubleshooting).
Included in the distribution are a number of useful .sh (Unix Shell) and .bat (DOS batch) programs located in the bin directory. If you installed the source distribution or used the installer, you can find this directory in the root directory of the distribution. If you installed the exist.war file (Web Application Archive), you will find the bin directory in the location the .war file was unpacked.
These shell and batch scripts are simply wrappers (interfaces between the executable Java programs) around the bootstrap loader contained in the jar file start.jar.
If you find the programs do not launch, you can also manually launch these files on the command-line, and specify which application you would like to start.
To manually launch these scripts:
|
startup.sh (Unix) / startup.bat (Windows) |
Enter on the command-line: java -jar start.jar jetty
Description: Starts the included Jetty web server at port 8080. eXist and Cocoon (a web development framework) are installed as a web application, located at http://localhost:8080/exist/. |
|---|---|
|
shutdown.sh (Unix) / shutdown.bat (Windows) |
Enter on the command-line: java -jar start.jar shutdown
Description: Closes running instance of eXist. If eXist has been started with startup.sh, calling shutdown.sh will also stop the Jetty web server. Otherwise, only the database is stopped by this call, since eXist has no control over the environment in which it is running. However, you should always call shutdown before killing the server process. This issue is discussed in detail in the succeeding section Shutting Down the Database. |
|
server.sh (Unix) / server.bat (Windows) |
Enter on the command-line: java -jar start.jar server
Description: Launches eXist as a stand-alone server process. In this setup, eXist is only accessible through the XMLRPC and the simple, built-in HTTP interface. |
|
client.sh (Unix) / client.bat (Windows) |
Enter on the command-line: java -jar start.jar client
Description: Launches the Java Administration Client - a graphical database interface. By default, this application is also launched if no application is selected on the command-line: java -jar start.jar
The Java Admin Client is discussed in detail the succeeding section Java Admin Client |