

This section discusses eXist's database backup/restore procedures. Users can use either the Java Admin Client or available Unix shell and Windows/DOS batch scripts to both backup their entire database onto files, and to restore it from a backup. Backups are strongly recommended for data protection in the event you experience a system crash or loss of data. Backups are also very useful for exporting data in order to re-import all or parts of the data to a different database, e.g. while upgrading eXist to a newer version.
During backup, eXist exports the contents of its database (as standard XML files) to a hierarchy of directories on the hard drive. This hierarchy is organized according to the organization of collections in the database.
Other files stored during backup include index configuration files and user settings. As well, resource and collection metadata is exported to a special XML file, called __contents__.xml, which lists information including the resource type, owner, modification date and/or the permissions assigned to a resource. You will find one __contents__.xml file in each directory created by the backup.
Since eXist uses an open XML format rather than a proprietary format for its database files, users can manually modify files in the backup directories without requiring special software. Any changes made to these files are reflected in the database with a restore or once the data is imported to another database system.
It is even possible to directly edit user data and permissions stored in the file /db/system/users.xml. This is particularly useful when making global changes to the user database. For example, to reset the passwords for all your users, you can simply edit the file users.xml by removing the password attribute, or set it to a default value and restore the document.
When migrating to a new eXist version, take care to use a version of the client corresponding to your server version. Usually, the backup process is backwards compatible. However, using a newer client version to create the backup from a server running an older version may sometimes lead to unexpected problems.
You can backup your database either by using the Admin Client menu, or the backup command line utility.
If you are using the Admin Client, do the following:
Select either the Backup Icon (arrow pointed upward) in the toolbar OR from the menu.
From the drop-down menu, select the collection to backup. To backup the entire database, select /db. Otherwise, select the topmost collection that should be stored. Note, however, that user data and permissions will only be exported if you backup the entire database.
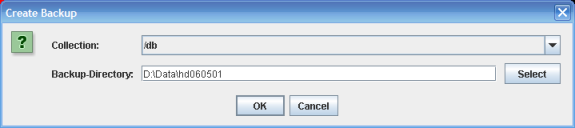
In the Backup-Directory field, enter the full directory path to the where you want the backup database files to be stored.
Click OK.
If you are using the command-line utility for the backup/restore, do the following:
To launch the utility, do ONE of the following:
start either the bin/backup.sh (Unix), OR the bin/backup.bat (Windows/DOS) script file
OR enter on the command-line:
To view the all of the available options for this command, use the -h parameter.
Use the -b parameter to indicate the collection path, and the -d parameter to indicate the target directory on your system. You can also specify the current admin username using the -u parameter, and the admin password using the -p parameter. For example, to backup the entire database on a Unix system to the target directory /var/backup/hd060501, you would enter the following:
By default, the utility connects to the database at the URI: xmldb:exist://localhost:8080/exist/xmlrpc. If you want to backup a database at a different location, specify its XML:DB URI (excluding any collection path) using the -o parameter. For example, the following backup on a Unix system specifies the database URI xmldb:exist://192.168.1.2:8080/exist/xmlrpc
Default settings for the user, password or server URIs can also be set via the backup.properties file.
To restore the database files from a backup, you can again use either the Admin Client, or the backup command line utility.
If you are using the Admin Client, do the following:
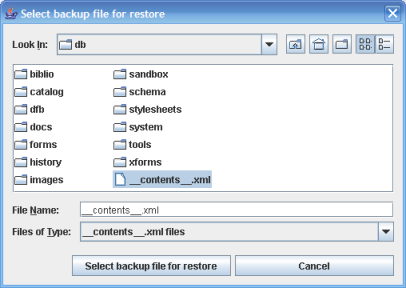
Select either the Restore Icon (arrow pointed downward) in the toolbar OR from the menu.
The dialog box shown below will then prompt you to select the backup file __contents__.xml from the topmost directory you want restored. To restore the entire database, select the __contents__.xml from the db/ directory.
A second dialog box will then prompt you for an admin password to use for the restore process. This password is required ONLY IF the password of the "admin" user set during the backup differs from the log-in password for the current session. (If you provide an incorrect password, the restore will be aborted.) If the passwords are different, note that restoring the user settings from the backup will cause the current user password to become invalid.
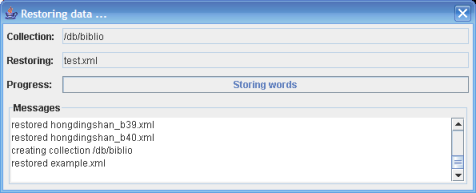
If the restore was accepted, a progress dialog box will display the restored files:
To restore from a backup using the command-line utility, follow the instructions above for launching bin/backup.sh (Unix), OR the bin/backup.bat (Windows/DOS) script files. Include the -r parameter, and the full path of the __contents__.xml file to restore. As with the Admin Client, if the backup uses a different password for the "admin" user than the current session, you must specify the backup password using the -P. For Example:
The restore operation will overwrite any existing resource in the database with the same path and name as a resource in the backup. However, resources in the database with different names will not be touched.
Whenever the /db/system collection is restored, the existing user database is overwritten by the backup database. Consequently, new users added or user setting changes to the old database after a backup will be lost following a database restore.
